
Finger Joint Pain – Its Causes and Treatments
From a tingling sensation to a buzzing pain, any sort of discomfort with the fingers can make regular activities all the more difficult. The finger

All of us have dealt with sore muscles at some point in our lives. It could be because of an intense workout or a weird way we slept one night, but it is still something that bothers us massively. And, the usual route we take to deal with the pain is use painkillers or use ointments as external application. However, these are just temporary solutions. For a longer term effect physical exercise is necessary and none is better than Yoga.
Yoga is a powerful practice that helps us stay active, manage stress, and also help with pain management. Yoga helps because of its strong focus on breathing, which energizes and relaxes our nervous system, here are some examples of how. Secondly, we move in so many different ways and planes of motion in a yoga class that it works like a complete reset for our posture. And a good posture means less pain. That’s why a wholesome yoga practice with a wide variety of poses and mindful breathing helps reduce chronic pain and stiffness in muscles or joints.
Here are several strengthening and stretching postures that are particularly helpful in managing pain in the most common areas of the body.
So, here we have a few asanas that will certainly help you take care of your back pain and say goodbye to it for good:
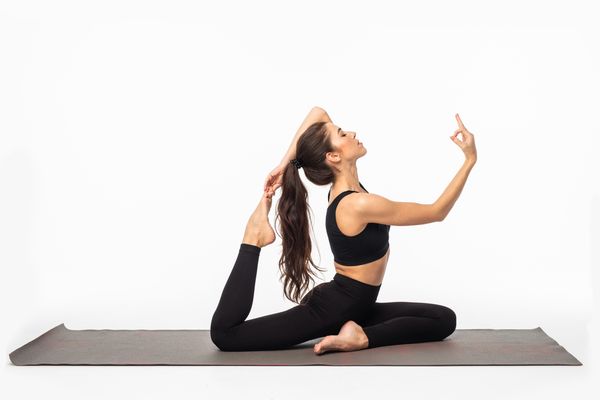
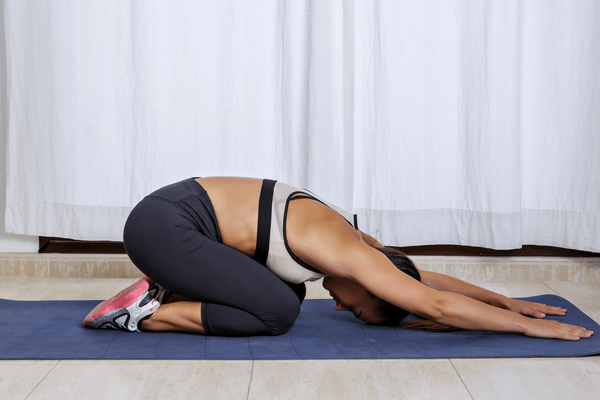
Our main focus with this asana is, spine and shoulders. Mainly for anyone who has trouble with their posture and is troubled by a sore back and tensed shoulders.
Duration – 5 to 10 minutes (Depends on how intense the pain is)
Difficulty Level – Beginner
Number of Breaths – Min. 5 | Max. 10
The main focus for this asana is, to relax the shoulders. Mainly for people who have to deal with tensed shoulders and chronic shoulder pain.
Duration – 7 to 12 Minutes.
Difficulty Level – Beginner.
Number of Breaths – Min. 5 | Max. 10
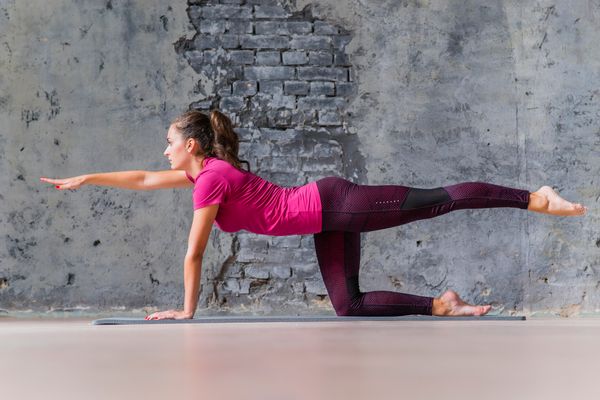
The main focus of this asana are the glutes and hamstring muscles in your body. This is a common area of tension for athletes and physically active individuals. Strengthening your hamstring prevents any severe injuries in that area, which is crucial for your well-being.
Duration – 5 to 10 minutes (Depends on how intense the pain is)
Difficulty Level – Beginner
Number of Breaths – Min. 5 | Max. 10
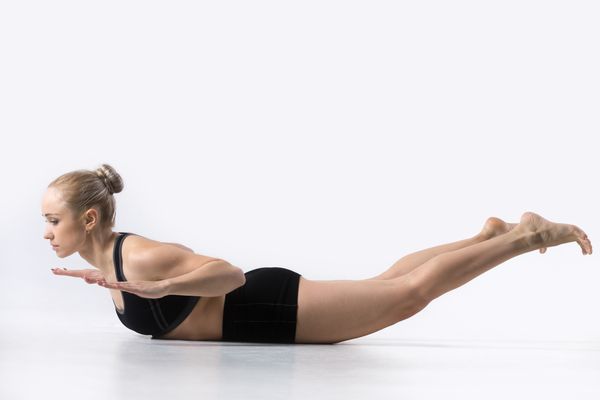
The main focus here is to again, focus on your glutes and your lower back. But, this particular asana isn’t just for athletes and physically active people but even for people suffering from chronic lower back pain. It helps not just in relieving the pain but also in, strengthening your back and improving your posture thereby preventing any future back issues.
Duration – 5-10 minutes (Depends on how intense the pain is)
Difficulty Level – Intermediate
Number of Breaths – Min. 5 / Max. 10
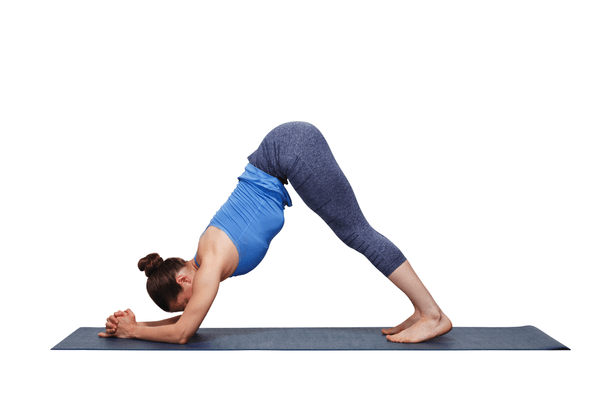
The main focus of this asana, is on your shoulders and upper back. This asana helps to stretch and exercise areas in your body that normally don’t get as much exercise. Your upper back lies dormant for most of your life and getting a nice stretch there can be crucial but often difficult.
Duration – 5-10 minutes (Depends on how intense the pain is)
Difficulty Level – Beginner
Number of Breaths – Min. 5 / Max. 10
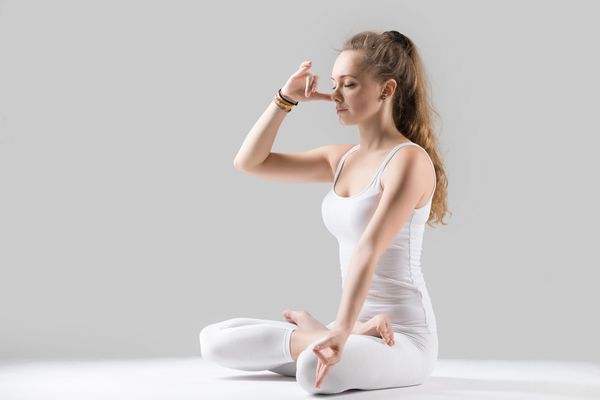
Pranayama is a very common exercise that helps in improving not just your breathing levels and your lung capacity but also any chronic pain you feel. As, it causes oxygen levels to rise throughout your body and make it reach every nook and cranny of your body, helping you heal much faster.
To get the best results from your yoga practice, you must include pranayama. Spend a minimum of 3 mins practicing either of these three techniques:
Duration – 15 -20 minutes(Depends on how intense the pain is)
Difficulty Level – Beginner
Number of Breaths – Min. 5 / Max. 10
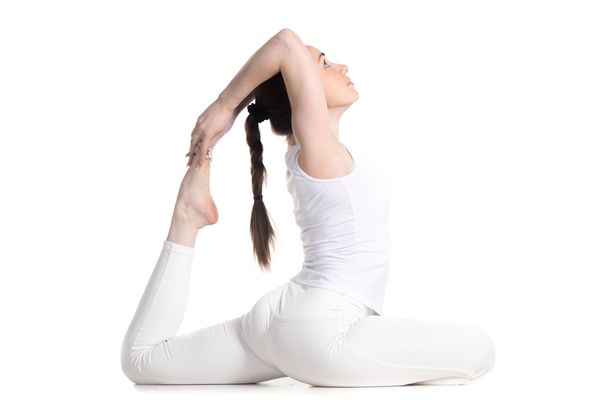
The main focus here is to get a good stretch going in your lower back and hamstring region. It is commonly known that the hamstring region is a very important part of our body and one that requires regular attention otherwise it becomes very tender and prone to injury.
Duration – 5-10 minutes (Depends on how intense the pain is)
Difficulty Level – Intermediate
Number of Breaths – Min. 5 / Max. 10
In conclusion, we would like to say that, Yoga is one of the most effective ways to deal with pain relief. And, if you are someone who is suffering from chronic pain, then Yoga is definitely the way to go, because Yoga is more than just easing stress and centering your mind, it also has very real effects on your body as well in a physical sense.
We hope you found what you were looking for through this article. But, in case Yoga isn’t really your cup of tea perhaps we can interest you in checking out MYDr.’s Pain Relief Spray, Pain Relief Oil and Pain Relief Cream. The best and most organic pain relief products on the medical market right now.
From a tingling sensation to a buzzing pain, any sort of discomfort with the fingers can make regular activities all the more difficult. The finger

Sleep is an integral part of our lives and essential for our overall health and well-being. It is becoming more widely acknowledged as a crucial

Ankle pain is any kind of pain or discomfort in your ankles. This could be caused by an injury or a medical condition. The most
Instant and Long term Pain Relief for All Ages